コントロール系のGUIコンポーネントは、テキストの入力、アナログ量の入力、オン / オフの切り替え、複数の選択肢から一つまたは複数を選択を可能とします。
このカリキュラムでは次に示すGUIコンポーネントについて学習します。番号1から4までをボタン入力,番号5と6をシーク入力、番号7と8までをテキスト入力とし、それぞれの項目で説明します。
- Switch
- CheckBox
- RadioButton
- Chip
- SeekBar
- ProgressBar
- EditText
- FloatingActionButton (FAB)
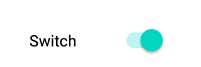
Switchは、オン / オフを切り替えるときに使います。次のように表示されます。
CheckBoxは、複数の選択肢の中から 1 つまたは複数選択したり、 Switch のような使い方もします。次のように表示されます。

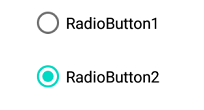
RadioButtonは、複数の選択肢の中から 1 つを選択するときに使います。次のように表示されます。
Chipは、情報を入力したり、選択したり、コンテンツをフィルタリングするときに使います。またボタンの代わりとして使う場面もあります。次のように表示されます。

SeekBarは、バーの間にあるコントローラを動かすことによって値を調整するときに使います。次のように表示されます。

ProgressBarは、処理中の進捗状況を表すときに使います。円形のものや、バー状のものがあります。次のように表示されます。

EditTextは、テキストを入力するときに使います。次のように表示されます。プロパティ「inputType」を設定することにより、様々な形式でテキストを入力できます。

FloatingActionButtonは、画面のメインとなるアクションに使います。次のように表示されます。

ボタン入力
ボタン入力では、次に示す各種ボタンが表示され、ボタンを押すことにより押されたボタンがテキスト表示されるJavaコードを作成します。
- Switch
- CheckBox
- RadioButton
- Chip
「3.1 Android StuidioによるAndroidプロジェクトの作成」で「MainActivity.java」と「activity_main.xml」を作成します。
アプリマニフェスト「AndroidManifest.xml」の修正について(注意)
「5.3 GUIの基礎(ナビゲーション系)」でアプリマニフェスト「AndroidManifest.xml」を修正しています。このまま、ほかのサンプルコードを実装すると動作が不定になります。
このため、サンプルコードの確認後は元に戻すか、もしくは現状のプロジェクトを削除して、再度「3.1 Android StuidioによるAndroidプロジェクトの作成」に従ってプロジェクトを作成してください。
「5.3 GUIの基礎(ナビゲーション系)」で変更したアプリマニフェスト「AndroidManifest.xml」を以下のように戻します。
<?xml version="1.0" encoding="utf-8"?>
<manifest xmlns:android="http://schemas.android.com/apk/res/android"
    package="com.example.myapplication">

    <application
        android:allowBackup="true"
        android:icon="@mipmap/ic_launcher"
        android:label="@string/app_name"
        android:roundIcon="@mipmap/ic_launcher_round"
        android:supportsRtl="true"
        android:theme="@style/Theme.MyApplication">
        <activity
            android:name=".MainActivity"
            android:exported="true">
            <intent-filter>
                <action android:name="android.intent.action.MAIN" />

                <category android:name="android.intent.category.LAUNCHER" />
            </intent-filter>
        </activity>
    </application>

</manifest>
ボタン入力の作成
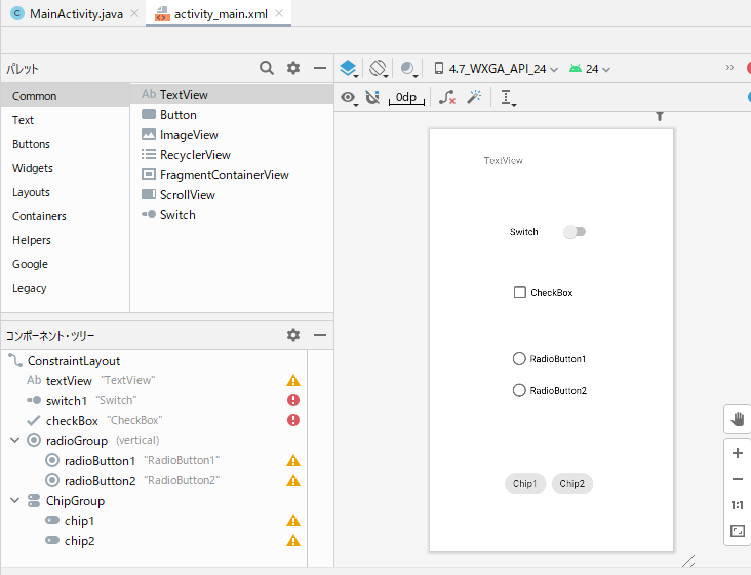
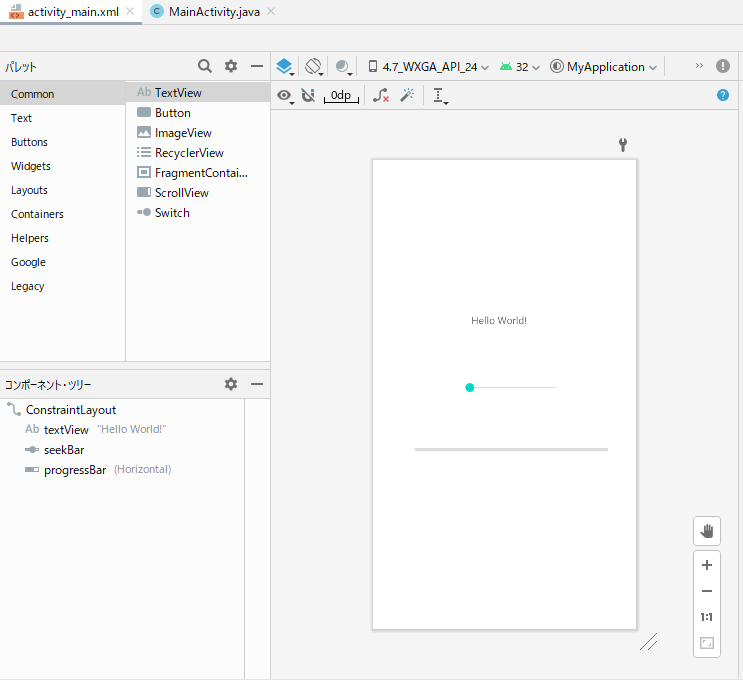
デザインエディタを開きます。ボタンは順次Switch、CheckBox、RadioButton、Chipとパレットから選択して次のように配置します。配置方法については、「5.1 デザインエディタの操作方法」の「Buttonの作成」を参照します。RadioButtonとChipでは、RadioGroupやChipGroupを使用してグループ化して、グループ内で一つのボタンが選択できるように配置します。なお、プロジェクト作成時に作成された「TextView」のプロパティ「text」はブランクに設定します。
- パレットの「Buttons」から「Switch」を選択してコンポーネントツリー最後にドラッグアンドドロップし、表示された「Switch」をドラッグして配置します。プロパティ「id」は「switch1」、プロパティ「text」は「Switch」に設定します。
- パレットの「Buttons」から「CheckBox」を選択してコンポーネントツリー最後にドラッグアンドドロップし、表示された「CheckBox」をドラッグして配置します。プロパティ「id」は「checkBox」、プロパティ「text」は「CheckBox」に設定します。
- パレットの「Buttons」から「RadioGroup」を選択してコンポーネントツリー最後にドラッグアンドドロップし、表示された「RadioGroup」をドラッグして配置します。プロパティ「id」は「radioGroup」に設定します。
- パレットの「Buttons」から「RadioButton」を選択して、「RadioGroup」配下のコンポーネントツリー最後にドラッグアンドドロップし、表示された「RadioButton」をドラッグして配置します。プロパティ「id」は「radioButton1」、プロパティ「text」は「RadioButton1」に設定します。
- パレットの「Buttons」から「RadioButton」を選択して、「RadioGroup」配下のコンポーネントツリー最後にドラッグアンドドロップし、表示された「RadioButton」をドラッグして配置します。プロパティ「id」は「radioButton2」、プロパティ「text」は「RadioButton2」に設定します。
- パレットの「Buttons」から「ChipGroup」を選択してコンポーネントツリー最後にドラッグアンドドロップし、表示された「ChipGroup」をドラッグして配置します。
- パレットの「Buttons」から「Chip」を選択して、「ChipGroup」配下のコンポーネントツリー最後にドラッグアンドドロップし、表示された「Chip」をドラッグして配置します。プロパティ「id」は「chip1」、プロパティ「text」は「Chip1」に設定します。
- パレットの「Buttons」から「Chip」を選択して、「ChipGroup」配下のコンポーネントツリー最後にドラッグアンドドロップし、表示された「Chip」をドラッグして配置します。プロパティ「id」は「chip2」、プロパティ「text」は「Chip2」に設定します。
GUIコンポーネントの配置が終了するとデザインエディタには次のように表示されます。
デザインエディタの「ビューモード」を使って、「コード」モードに切り替えると、xmlファイル「activity_main.xml」がxml形式のコードで次のように表示されます。それぞれのxml形式のコードで記述されたGUIコンポーネントは次のように使用します。
activity_main.xml
<?xml version="1.0" encoding="utf-8"?>
<androidx.constraintlayout.widget.ConstraintLayout xmlns:android="http://schemas.android.com/apk/res/android"
    xmlns:app="http://schemas.android.com/apk/res-auto"
    xmlns:tools="http://schemas.android.com/tools"
    android:layout_width="match_parent"
    android:layout_height="match_parent"
    tools:context=".MainActivity">

    <!-- #① -->
    <TextView
        android:id="@+id/textView"
        android:layout_width="199dp"
        android:layout_height="39dp"
        android:text="TextView"
        app:layout_constraintBottom_toBottomOf="parent"
        app:layout_constraintEnd_toEndOf="parent"
        app:layout_constraintStart_toStartOf="parent"
        app:layout_constraintTop_toTopOf="parent"
        app:layout_constraintVertical_bias="0.062" />

    <!-- #➁ -->
    <Switch
        android:id="@+id/switch1"
        android:layout_width="123dp"
        android:layout_height="27dp"
        android:text="Switch"
        app:layout_constraintBottom_toBottomOf="parent"
        app:layout_constraintEnd_toEndOf="parent"
        app:layout_constraintStart_toStartOf="parent"
        app:layout_constraintTop_toTopOf="parent"
        app:layout_constraintVertical_bias="0.232" />

    <!-- #③ -->
    <CheckBox
        android:id="@+id/checkBox"
        android:layout_width="134dp"
        android:layout_height="46dp"
        android:text="CheckBox"
        app:layout_constraintBottom_toBottomOf="parent"
        app:layout_constraintEnd_toEndOf="parent"
        app:layout_constraintHorizontal_bias="0.519"
        app:layout_constraintStart_toStartOf="parent"
        app:layout_constraintTop_toTopOf="parent"
        app:layout_constraintVertical_bias="0.378" />

    <!-- #④ -->
    <RadioGroup
        android:id="@+id/radioGroup"
        android:layout_width="136dp"
        android:layout_height="128dp"
        app:layout_constraintBottom_toBottomOf="parent"
        app:layout_constraintEnd_toEndOf="parent"
        app:layout_constraintHorizontal_bias="0.52"
        app:layout_constraintStart_toStartOf="parent"
        app:layout_constraintTop_toTopOf="parent"
        app:layout_constraintVertical_bias="0.633">

        <!-- #⑤ -->
        <RadioButton
            android:id="@+id/radioButton1"
            android:layout_width="match_parent"
            android:layout_height="wrap_content"
            android:text="RadioButton1" />

        <!-- #⑤ -->
        <RadioButton
            android:id="@+id/radioButton2"
            android:layout_width="match_parent"
            android:layout_height="wrap_content"
            android:text="RadioButton2" />
    </RadioGroup>

    <!-- #⑥ -->
    <com.google.android.material.chip.ChipGroup
        android:layout_width="146dp"
        android:layout_height="56dp"
        app:layout_constraintBottom_toBottomOf="parent"
        app:layout_constraintEnd_toEndOf="parent"
        app:layout_constraintHorizontal_bias="0.518"
        app:layout_constraintStart_toStartOf="parent"
        app:layout_constraintTop_toTopOf="parent"
        app:layout_constraintVertical_bias="0.88">

        <!-- #⑦ -->
        <com.google.android.material.chip.Chip
            android:id="@+id/chip1"
            android:layout_width="wrap_content"
            android:layout_height="wrap_content"
            android:width="50dp"
            android:text="Chip1" />

        <!-- #⑦ -->
        <com.google.android.material.chip.Chip
            android:id="@+id/chip2"
            android:layout_width="wrap_content"
            android:layout_height="wrap_content"
            android:text="Chip2" />
    </com.google.android.material.chip.ChipGroup>
</androidx.constraintlayout.widget.ConstraintLayout>- #①は、押されたボタンの表示
- #➁は、Switch
- #③は、CheckBox
- #④は、RadioGroup
- #⑤は、RadioButton
- #⑥は、ChipGroup
- #⑦は、Chip
ボタン入力のイベント処理
Switchの操作に応じて処理を行う場合は、イベントリスナとボタンを関連付けるために、「setOnCheckedChangeListener」メソッドを利用します。「setOnCheckedChangeListener」メソッドにはコールバックメソッドとして、Switchがクリックされたときにイベントが発生して「onCheckedChanged」メソッが呼ばれます。
CheckBoxの操作に応じて処理を行う場合は、イベントリスナとボタンを関連付けるために、「setOnCheckedChangeListener」メソッドを利用します。「setOnCheckedChangeListener」メソッドにはコールバックメソッドとして、CheckBoxがクリックされたときにイベントが発生して「onClick」メソッが呼ばれます。
RadioGroupで複数のRadioButtonを管理する場合は、イベントリスナとボタンを関連付けるために、「setOnCheckedChangeListener」メソッドを利用します。「setOnCheckedChangeListener」メソッドにはコールバックメソッドとして、RadioButtonがクリックされたときにイベントが発生して「onCheckedChanged」メソッが呼ばれます。
ChipGroupで複数のChipを管理する場合は、イベントリスナとボタンを関連付けるために、「setOnClickListener」メソッドを利用します。「setOnClickListener」メソッドにはコールバックメソッドとして、Chipがクリックされたときにイベントが発生して「onClick」メソッが呼ばれます。
MainActivity.java
package com.example.myapplication;

import androidx.appcompat.app.AppCompatActivity;

import android.os.Bundle;
import android.view.View;
import android.widget.CheckBox;
import android.widget.CompoundButton;
import android.widget.RadioButton;
import android.widget.RadioGroup;
import android.widget.Switch;
import android.widget.TextView;

import com.google.android.material.chip.Chip;

public class MainActivity extends AppCompatActivity {

    private TextView textView = null;
    private Switch mSwitch = null;
    private Chip chip1;
    private Chip chip2;

    @Override
    protected void onCreate(Bundle savedInstanceState) {
        super.onCreate(savedInstanceState);
        setContentView(R.layout.activity_main);

        textView = findViewById(R.id.textView);                                                  // #0-①
        textView.setText("                                            ");                        // #0-➁

        mSwitch = (Switch) findViewById(R.id.switch1);                                           // #1-①
        mSwitch.setOnCheckedChangeListener(new CompoundButton.OnCheckedChangeListener() {        // #1-➁
            @Override
            public void onCheckedChanged(CompoundButton buttonView, boolean isChecked) {         // #1-③
                if (mSwitch.isChecked()) {                                                       // #1-④
                    textView.setText("Switch On                                       ");        // #1-⑤
                } else {
                    textView.setText("Switch Off                                       ");       // #1-⑥
                }
            }
        });

        final CheckBox chkbox = (CheckBox) findViewById(R.id.checkBox);                          // #2-①
        chkbox.setOnClickListener(new View.OnClickListener() {                                   // #2-➁

            @Override
            public void onClick(View v) {                                                       // #2-③
                // TODO Auto-generated method stub
                if (chkbox.isChecked() == true) {                                               // #2-④
                    textView.setText("CheckBox チェックあり                                       ");   // #2-⑤
                } else {
                    textView.setText("CheckBox チェックなし                                       ");   // #2-⑥
                }
            }
        });


        RadioGroup group = (RadioGroup) findViewById(R.id.radioGroup);                          // #3-①
        group.setOnCheckedChangeListener(new RadioGroup.OnCheckedChangeListener() {             // #3-➁

            @Override
            public void onCheckedChanged(RadioGroup group, int checkedId) {                     // #3-③
                RadioButton radio = (RadioButton) findViewById(checkedId);                      // #3-④
                if (radio.isChecked()) {                                                        // #3-⑤
                    textView.setText(radio.getText() + "  チェックあり                              ");   // #3-⑥
                }
            }
        });

        // chips is handled using the
        // normal OnClickListener callback
        chip1 = findViewById(R.id.chip1);                                                       // #4-①
        chip1.setOnClickListener(new View.OnClickListener() {                                   // #4-➁
            @Override
            public void onClick(View v) {                                                       // #4-③
                textView.setText("Chip1 On                                       ");            // #4-④
            }
        });

        chip2 = findViewById(R.id.chip2);                                                       // #4-⑤
        chip2.setOnClickListener(new View.OnClickListener() {                                   // #4-⑥
            @Override
            public void onClick(View v) {                                                       // #4-⑦
                textView.setText("Chip2 On                                       ");            // #4-⑧
            }
        });
    }
}- #0-①は、クリックしたボタンをテキスト表示するTextViewを取得する
- #0-➁は、クリックしたボタンをテキスト表示するTextViewを初期化する
- #1-①は、Switchを取得する
- #1-➁は、取得したSwitchがクリックされたときに、発生したイベントを受け取るイベントリスナを、「setOnCheckedChangeListener」メソッドを使って関連付ける
- #1-③は、Switchの状態が変化したとき、発生したイベントを受け取る「onCheckedChanged」を定義する
- #1-④は、Switchがクリックされたかを判断する
- #1-⑤は、TextViewに「Switch On」を表示する
- #1-⑥は、TextViewに「Switch Off」を表示する
- #2-①はで、CheckBoxを取得する
- #2-➁は、取得したCheckBoxがクリックされたときに、発生したイベントを受け取るイベントリスナを、「setOnCheckedChangeListener」メソッドを使って関連付ける
- #2-③は、CheckBoxの状態が変化したとき、発生したイベントを受け取る「onClick」を定義する
- #2-④は、チェックされたかを判断する
- #2-⑤は、TextViewに「CheckBoxチェックあり」を表示する
- #2-⑥は、TextViewに「CheckBox チェックなし」を表示する
- #3-①は、RadioGroupを取得する
- #3-➁は、取得したRadioGroup内のRadioButtonがクリックされたときに、発生したイベントを受け取るイベントリスナを、「setOnCheckedChangeListener」メソッドを使って関連付ける
- #3-③は、RadioButtonがクリックされたとき、発生したイベントを受け取る「onCheckedChanged」を定義する
- #3-④は、クリックされたRadioButtonを取得する
- #3-⑤は、チェックされたかを判断する
- #3-⑥は、TextViewに対応するRadioButton名と「チェックあり」を表示する
- #4-①は、Chip1を取得する
- #4-➁は、取得したChip1がクリックされたときに、発生したイベントを受け取るイベントリスナを、「setOnClickListener」メソッドを使って関連付ける
- #4-③は、Chip1がクリックされたとき、発生したイベントを受け取る「onClick」を定義する
- #4-④は、TextViewに「Chip1 On」を表示する
- #4-⑤は、Chip2を取得する
- #4-⑥は、取得したChip2がクリックされたときに、発生したイベントを受け取るイベントリスナを、「setOnClickListener」メソッドを使って関連付ける
- #4-⑦は、Chip2がクリックされたとき、発生したイベントを受け取る「onClick」を定義する
- #4-⑧は、TextViewに「Chip2 On」を表示する
ボタン入力の実行
作成したボタン入力のJavaコードをAndroidエミュレータで実行します。
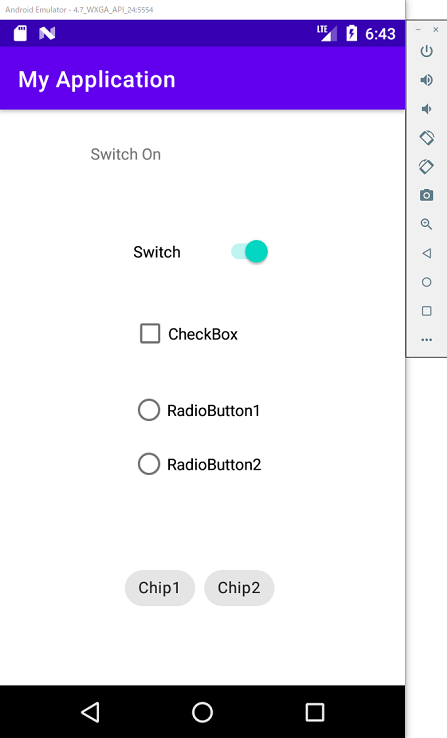
次のようにAndroidエミュレータに初期画面が表示されます。

「Switch」をクリックすると、次のように「Switch On」が表示されます。もう一度「Switch」をクリックすると、「Switch Off」が表示されます。
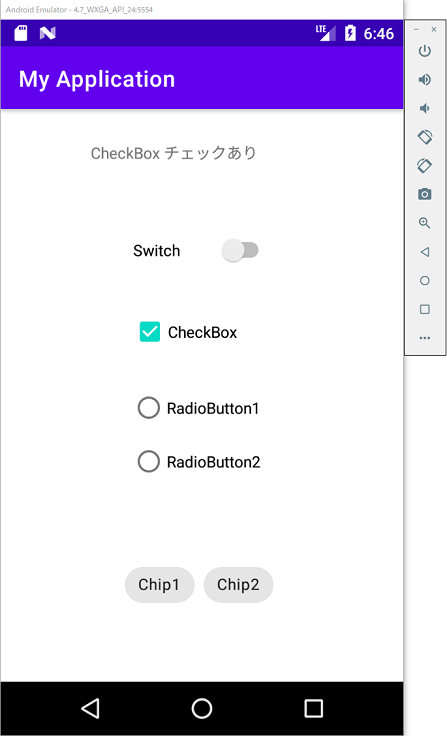
「CheckBox」をクリックすると、次のように「CheckBoxチェックあり」が表示されます。もう一度「CheckBox」をクリックすると「CheckBoxチェックなし」が表示されます。
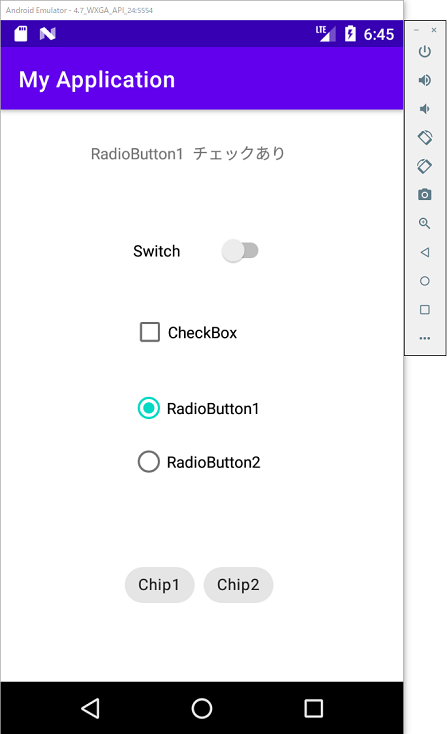
「RadioButton1」をクリックすると、次のように「RadioButton1 チェックあり」が表示されます。「RadioButton2」をクリックすると、「RadioButton2 チェックあり」が表示されます。
「Chip2」をクリックすると、次のように「Chip2 On」が表示されます。「Chip1」をクリックすると、「Chip1 On」が表示されます。

シーク入力
シーク入力では、SeekBarにあるコントローラを動かすとその動きに同期してProgressBarが移動し、その移動量がテキスト表示されるJavaコードを作成します。
「3.1 Android StuidioによるAndroidプロジェクトの作成」で「MainActivity.java」と「activity_main.xml」を作成します。
シーク入力の作成
デザインエディタを開きます。シーク入力のSeekBar、その動きに同期して移動させるProgressBarをパレットから選択して次のように配置します。配置方法については、「5.1 デザインエディタの操作方法」の「Buttonの作成」を参照します。なお、プロジェクト作成時に作成された「TextView」のプロパティ「text」はブランクに設定します。
- パレットの「Widgets」から「SeekBar」を選択してコンポーネントツリー最後にドラッグアンドドロップし、表示された「SeekBar」をドラッグして配置します。プロパティ「id」は「seekBar」に設定します。
- パレットの「Widgets」から「ProgressBar(Horizontal)」を選択してコンポーネントツリー最後にドラッグアンドドロップし、表示された「ProgressBar(Horizontal)」をドラッグして配置します。プロパティ「id」は「progressBar」に設定します。
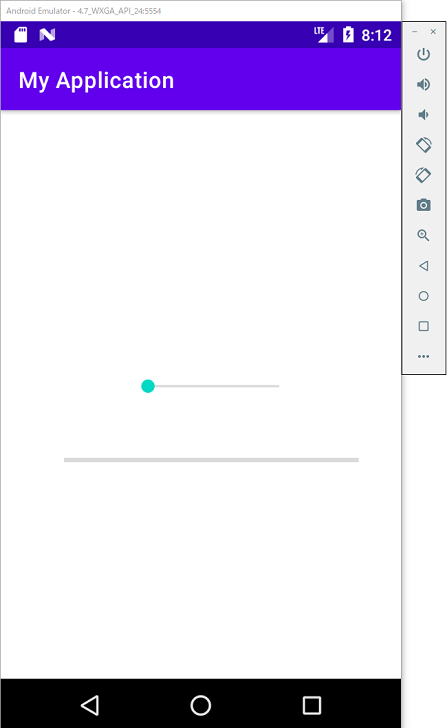
GUIコンポーネントの配置が終了するとデザインエディタには次のように表示されます。
デザインエディタの「ビューモード」を使って、「コード」モードに切り替えると、xmlファイル「activity_main.xml」がxml形式のコードで次のように表示されます。それぞれのxml形式のコードで記述されたGUIコンポーネントは次のように使用します。
activity_main.xml
<?xml version="1.0" encoding="utf-8"?>
<androidx.constraintlayout.widget.ConstraintLayout xmlns:android="http://schemas.android.com/apk/res/android"
    xmlns:app="http://schemas.android.com/apk/res-auto"
    xmlns:tools="http://schemas.android.com/tools"
    android:layout_width="match_parent"
    android:layout_height="match_parent"
    tools:context=".MainActivity">

    <!-- #① -->
    <TextView
        android:id="@+id/textView"
        android:layout_width="121dp"
        android:layout_height="32dp"
        android:text="Hello World!"
        app:layout_constraintBottom_toBottomOf="parent"
        app:layout_constraintHorizontal_bias="0.562"
        app:layout_constraintLeft_toLeftOf="parent"
        app:layout_constraintRight_toRightOf="parent"
        app:layout_constraintTop_toTopOf="parent"
        app:layout_constraintVertical_bias="0.344" />

    <!-- #➁ -->
    <SeekBar
        android:id="@+id/seekBar"
        android:layout_width="150dp"
        android:layout_height="19dp"
        app:layout_constraintBottom_toBottomOf="parent"
        app:layout_constraintEnd_toEndOf="parent"
        app:layout_constraintHorizontal_bias="0.555"
        app:layout_constraintStart_toStartOf="parent"
        app:layout_constraintTop_toTopOf="parent"
        app:layout_constraintVertical_bias="0.485" />

    <!-- #③ -->
    <ProgressBar
        android:id="@+id/progressBar"
        style="?android:attr/progressBarStyleHorizontal"
        android:layout_width="265dp"
        android:layout_height="36dp"
        app:layout_constraintBottom_toBottomOf="parent"
        app:layout_constraintEnd_toEndOf="parent"
        app:layout_constraintHorizontal_bias="0.602"
        app:layout_constraintStart_toStartOf="parent"
        app:layout_constraintTop_toTopOf="parent"
        app:layout_constraintVertical_bias="0.624" />

</androidx.constraintlayout.widget.ConstraintLayout>- #①は、コントローラの移動量の表示
- #➁は、SeekBar
- #③は、ProgressBar
シーク入力のイベント処理
SeekBarの操作に応じて処理を行う場合は、イベントリスナとボタンを関連付けるために、「setOnSeekBarChangeListener」メソッドを利用します。「setOnSeekBarChangeListener」メソッドにはコールバックメソッドとして、SeekBarが移動するときにイベントが発生して「onProgressChanged」メソッド、SeekBarが押されたときにイベントが発生して「 onStartTrackingTouch」メソッド、SeekBarが離されたときにイベントが発生して「 onStopTrackingTouch」メソッドがそれぞれ呼ばれます。
MainActivity.java
package com.example.myapplication;

import androidx.appcompat.app.AppCompatActivity;

import android.os.Bundle;
import android.widget.ProgressBar;
import android.widget.SeekBar;
import android.widget.TextView;

import java.util.Locale;

public class MainActivity extends AppCompatActivity {
    private TextView textView = null;
    private ProgressBar progressBar;

    @Override
    protected void onCreate(Bundle savedInstanceState) {
        super.onCreate(savedInstanceState);
        setContentView(R.layout.activity_main);

        textView = findViewById(R.id.textView);                                                  // #①
        textView.setText("                                            ");                        // #➁

        progressBar = findViewById(R.id.progressBar);                                            // #③
        progressBar.setMax(100);                                                                 // #④

        // SeekBar
        SeekBar seekBar = findViewById(R.id.seekBar);                                            // #⑤
        // 初期値
        seekBar.setProgress(0);                                                                  // #⑥
        // 最大値
        seekBar.setMax(100);                                                                     // #⑦
        seekBar.setOnSeekBarChangeListener(                                                      // #⑧
                new SeekBar.OnSeekBarChangeListener() {                                          // #⑨
                    //ツマミがドラッグされると呼ばれる
                    @Override
                    public void onProgressChanged(                                               // #⑩
                            SeekBar seekBar, int progress, boolean fromUser) {                   // #⑪

                        String str = String.format("%d %%", progress);
                        textView.setText(str);                                                   // #⑫
                        // progress
                        progressBar.setProgress(progress);                   }                   // #⑬
                    //ツマミがタッチされた時に呼ばれる
                    @Override
                    public void onStartTrackingTouch(SeekBar seekBar) {                          // #⑭
                        textView.setText("スライダー開始");                                      // #⑮
                    }
                    //ツマミがリリースされた時に呼ばれる
                    @Override
                    public void onStopTrackingTouch(SeekBar seekBar) {                           // #⑯
                        textView.setText("スライダー終了");                                      // #⑰
                    }
                });
    }
}- #①は、コントローラの移動量の割合を表示するTextViewを取得する
- #➁は、コントローラの移動量の割合を表示するTextViewを初期化する
- #③は、ProgressBarを取得する
- #④は、ProgressBarの最大値「100」を設定する
- #⑤は、SeekBarを取得する
- #⑥は、SeekBarを「0」で初期化する
- #⑦は、SeekBarの最大値「100」を設定する
- #⑧は、取得したSeekBarが押されたときに、発生したイベントを受け取るイベントリスナを、「setOnSeekBarChangeListener」メソッドを使って関連付ける
- #⑨は、SeekBarをオブジェクト化する
- #⑩は、SeekBarが移動するとき、発生したイベントを受け取る「onProgressChanged」を定義する
- #⑪は、移動量などのSeekBarの情報が渡される
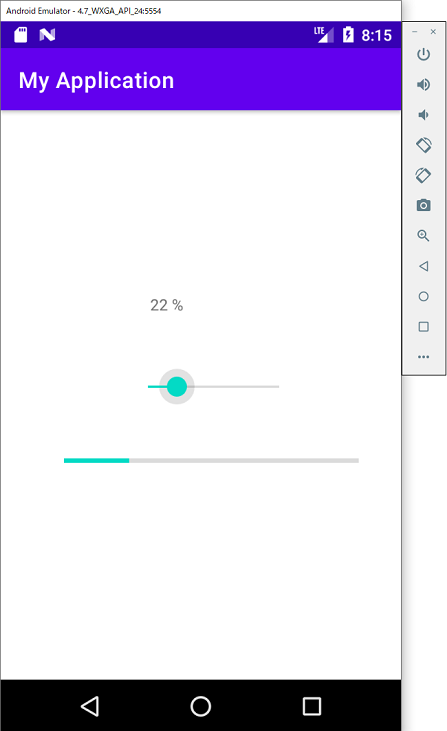
- #⑫は、TextViewにコントローラの移動量の割合を表示する
- #⑬は、ProgressBarにコントローラの移動量の割合を表示する
- #⑭は、SeekBarが押されたとき、発生したイベントを受け取る「onStartTrackingTouch」を定義する
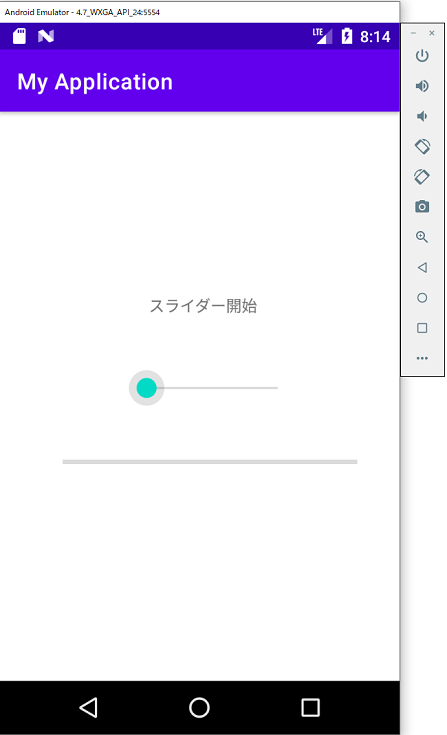
- #⑮は、TextViewに「スライダー開始」を表示する
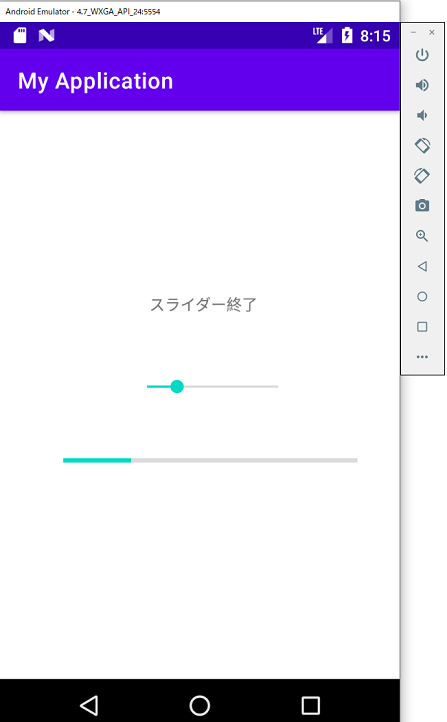
- #⑯は、SeekBarが離されたとき、発生したイベントを受け取る「onStopTrackingTouch」を定義する
- #⑰は、TextViewに「スライダー終了」を表示する
シーク入力の実行
作成したシーク入力のJavaコードをAndroidエミュレータで実行します。
次のようにAndroidエミュレータに初期画面が表示されます。
SeekBarをクリックすると「スライダー開始」が表示されます。
SeekBarをドラックするとコントローラの移動量が割合で表示され、その動きに応じてProgressBarが表示されます。
SeekBarをドラックを終了すると「スライダー終了」が表示されます。
テキスト入力
テキストを入力してボタンを押すと、入力したテキストが表示されるJavaコードを作成します。
「3.1 Android StuidioによるAndroidプロジェクトの作成」で「MainActivity.java」と「activity_main.xml」を作成します。
テキスト入力の作成
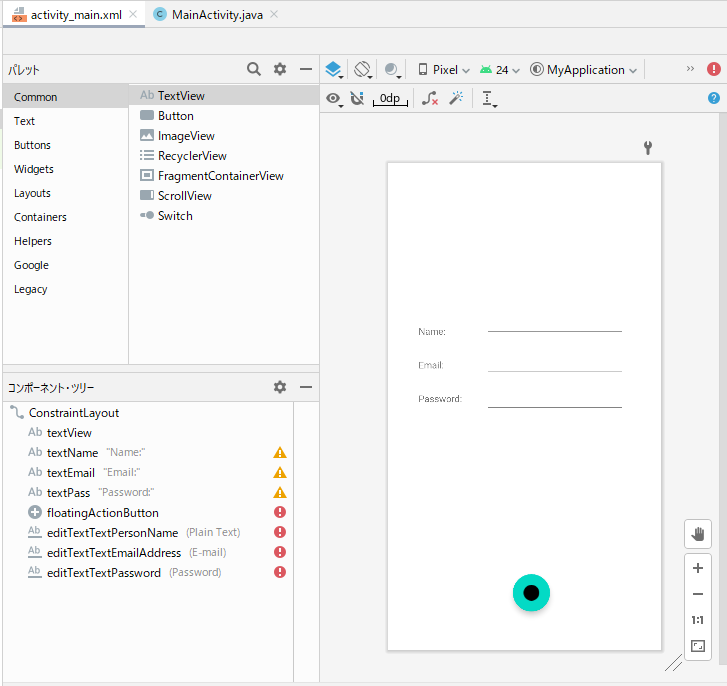
デザインエディタを開きます。テキストの入力はEditText、ボタンはFloatingActionButton、入力したテキストの表示はTextViewを、パレットから選択して次のように配置します。配置方法については、「5.1 デザインエディタの操作方法」の「Buttonの作成」を参照します。なお、プロジェクト作成時に作成された「TextView」のプロパティ「text」はブランクに設定します。
- パレットの「Text」から「TextView」を選択してコンポーネントツリー最後にドラッグアンドドロップし、表示された「TextView」をドラッグして配置します。プロパティ「id」は「textName」、プロパティ「text」は「Name:」に設定します。
- パレットの「Text」から「TextView」を選択してコンポーネントツリー最後にドラッグアンドドロップし、表示された「TextView」をドラッグして配置します。プロパティ「id」は「textEmail」、プロパティ「text」は「Email:」に設定します。
- パレットの「Text」から「TextView」を選択してコンポーネントツリー最後にドラッグアンドドロップし、表示された「TextView」をドラッグして配置します。プロパティ「id」は「textPass」、プロパティ「text」は「Password:」に設定します。
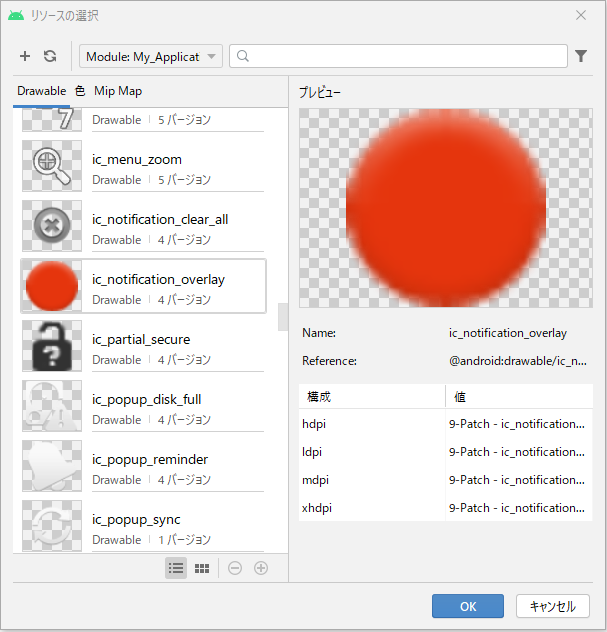
- パレットの「Buttons」から「FloatingActionButton」を選択してコンポーネントツリー最後にドラッグアンドドロップし、表示された「FloatingActionButton」をドラッグして配置します。プロパティ「id」は「floatingActionButton」、プロパティ「srcCompat」は「ic_notification_overlay」に設定します。
- パレットの「Text」から「Plain Text」を選択してコンポーネントツリー最後にドラッグアンドドロップし、表示された「Plain Text」をドラッグして配置します。プロパティ「id」は「editTextTextPersonName」、プロパティ「inputType」は「textPersonName」に設定します。
- パレットの「Text」から「E-mail」を選択してコンポーネントツリー最後にドラッグアンドドロップし、表示された「E-mail」をドラッグして配置します。プロパティ「id」は「editTextTextEmailAddress」、プロパティ「inputType」は「textEmailAddress」に設定します。
- パレットの「Text」から「Password」を選択してコンポーネントツリー最後にドラッグアンドドロップし、表示された「Password」をドラッグして配置します。プロパティ「id」は「editTextTextPassword」、プロパティ「inputType」は「textPassword」に設定します。
GUIコンポーネントの配置が終了するとデザインエディタには次のように表示されます。
EditTextのプロパティ「inputType」に指定できる属性値を次に示します。プロパティ「inputType」の指定により、システムが適切なソフト入力方法(画面キーボードなど)を表示するように指定できます。
| タイプ | 説明 |
|---|---|
| text | 普通のテキストを入力 |
| textPersonName | 人名を入力する |
| textEmailAddress | メールアドレスを入力する |
| textPassword | パスワードを入力する |
| textMultiLine | 文字を複数行入力する |
| textUri | URLを入力する |
| number | 数値入力する |
FloatingActionButtonのアイコンを示すプロパティ「srcCompat」の設定では、プロパティ「srcCompat」の右側にあるボタンを押すと、「リソースの選択」画面が表示されるので、「ic_notification_overlay」を選択します。これによりアイコンが設定されます。
デザインエディタの「ビューモード」を使って、「コード」モードに切り替えると、xmlファイル「activity_main.xml」がxml形式のコードで次のように表示されます。それぞれのxml形式のコードで記述されたGUIコンポーネントは次のように使用します。
activity_main.xml
<?xml version="1.0" encoding="utf-8"?>
<androidx.constraintlayout.widget.ConstraintLayout xmlns:android="http://schemas.android.com/apk/res/android"
    xmlns:app="http://schemas.android.com/apk/res-auto"
    xmlns:tools="http://schemas.android.com/tools"
    android:layout_width="match_parent"
    android:layout_height="match_parent"
    tools:context=".MainActivity">

    <!-- #① -->
    <TextView
        android:id="@+id/textView"
        android:layout_width="167dp"
        android:layout_height="108dp"
        app:layout_constraintBottom_toBottomOf="parent"
        app:layout_constraintHorizontal_bias="0.602"
        app:layout_constraintLeft_toLeftOf="parent"
        app:layout_constraintRight_toRightOf="parent"
        app:layout_constraintTop_toTopOf="parent"
        app:layout_constraintVertical_bias="0.128" />

    <!-- #➁ -->
    <TextView
        android:id="@+id/textName"
        android:layout_width="wrap_content"
        android:layout_height="wrap_content"
        android:text="Name:"
        app:layout_constraintBottom_toBottomOf="parent"
        app:layout_constraintEnd_toEndOf="parent"
        app:layout_constraintHorizontal_bias="0.124"
        app:layout_constraintStart_toStartOf="parent"
        app:layout_constraintTop_toTopOf="parent"
        app:layout_constraintVertical_bias="0.341" />

    <!-- #③ -->
    <TextView
        android:id="@+id/textEmail"
        android:layout_width="wrap_content"
        android:layout_height="wrap_content"
        android:text="Email:"
        app:layout_constraintBottom_toBottomOf="parent"
        app:layout_constraintEnd_toEndOf="parent"
        app:layout_constraintHorizontal_bias="0.123"
        app:layout_constraintStart_toStartOf="parent"
        app:layout_constraintTop_toTopOf="parent"
        app:layout_constraintVertical_bias="0.412" />

    <!-- #④ -->
    <TextView
        android:id="@+id/textPass"
        android:layout_width="wrap_content"
        android:layout_height="wrap_content"
        android:text="Password:"
        app:layout_constraintBottom_toBottomOf="parent"
        app:layout_constraintEnd_toEndOf="parent"
        app:layout_constraintHorizontal_bias="0.133"
        app:layout_constraintStart_toStartOf="parent"
        app:layout_constraintTop_toTopOf="parent"
        app:layout_constraintVertical_bias="0.483" />

    <!-- #⑤ -->
    <com.google.android.material.floatingactionbutton.FloatingActionButton
        android:id="@+id/floatingActionButton"
        android:layout_width="wrap_content"
        android:layout_height="wrap_content"
        android:clickable="true"
        app:layout_constraintBottom_toBottomOf="parent"
        app:layout_constraintEnd_toEndOf="parent"
        app:layout_constraintHorizontal_bias="0.529"
        app:layout_constraintStart_toStartOf="parent"
        app:layout_constraintTop_toTopOf="parent"
        app:layout_constraintVertical_bias="0.914"
        app:srcCompat="@android:drawable/ic_notification_overlay" />

    <!-- #⑥ -->
    <EditText
        android:id="@+id/editTextTextPersonName"
        android:layout_width="wrap_content"
        android:layout_height="wrap_content"
        android:ems="10"
        android:inputType="textPersonName"
        app:layout_constraintBottom_toBottomOf="parent"
        app:layout_constraintEnd_toEndOf="parent"
        app:layout_constraintHorizontal_bias="0.726"
        app:layout_constraintStart_toStartOf="parent"
        app:layout_constraintTop_toTopOf="parent"
        app:layout_constraintVertical_bias="0.316" />

    <!-- #⑦ -->
    <EditText
        android:id="@+id/editTextTextEmailAddress"
        android:layout_width="wrap_content"
        android:layout_height="wrap_content"
        android:ems="10"
        android:inputType="textEmailAddress"
        app:layout_constraintBottom_toBottomOf="parent"
        app:layout_constraintEnd_toEndOf="parent"
        app:layout_constraintHorizontal_bias="0.731"
        app:layout_constraintStart_toStartOf="parent"
        app:layout_constraintTop_toTopOf="parent"
        app:layout_constraintVertical_bias="0.402" />

    <!-- #⑧ -->
    <EditText
        android:id="@+id/editTextTextPassword"
        android:layout_width="wrap_content"
        android:layout_height="wrap_content"
        android:ems="10"
        android:inputType="textPassword"
        app:layout_constraintBottom_toBottomOf="parent"
        app:layout_constraintEnd_toEndOf="parent"
        app:layout_constraintHorizontal_bias="0.731"
        app:layout_constraintStart_toStartOf="parent"
        app:layout_constraintTop_toTopOf="parent"
        app:layout_constraintVertical_bias="0.481" />

</androidx.constraintlayout.widget.ConstraintLayout>- #①は、入力したテキストの表示
- #➁は、「Name:」ラベルの表示
- #③は、「Email:」ラベルの表示
- #④は、「Password:」ラベルの表示
- #⑤は、FloatingActionButton
- #⑥は、「Name」の入力
- #⑦は、「Email」の入力
- #⑧は、「Password」の入力
テキスト入力のイベント処理
FloatingActionButtonのクリックに応じて処理を行う場合は、イベントリスナとボタンを関連付けるために、「setOnClickListener」メソッドを利用します。「setOnClickListener」メソッドにはコールバックメソッドとして「onClick」メソッドが定義されており、FloatingActionButtonがクリックされたときにイベントが発生して、「onClick」メソッドが呼ばれます。
MainActivity.java
package com.example.myapplication;

import androidx.appcompat.app.AppCompatActivity;

import android.os.Bundle;
import android.view.View;
import android.widget.TextView;
import android.widget.EditText;

import com.google.android.material.floatingactionbutton.FloatingActionButton;

public class MainActivity extends AppCompatActivity {
    private TextView textView = null;
    private EditText editPersonName;
    private EditText editEmailAddress;
    private EditText editPassword;

    @Override
    protected void onCreate(Bundle savedInstanceState) {
        super.onCreate(savedInstanceState);
        setContentView(R.layout.activity_main);

        textView = findViewById(R.id.textView);                                                   // #①
        textView.setText("                                            ");                         // #➁

        editPersonName = findViewById(R.id.editTextTextPersonName);                               // #③
        editEmailAddress = findViewById(R.id.editTextTextEmailAddress);                           // #④
        editPassword = findViewById(R.id.editTextTextPassword);                                   // #⑤
        // FloatingActionButton
        FloatingActionButton fab = (FloatingActionButton) findViewById(R.id.floatingActionButton); // #⑥
        fab.setOnClickListener(new View.OnClickListener() {                                        // #⑦
            @Override
            public void onClick(View v) {                                                          // #⑧
                textView.setText("Name: " + editPersonName.getText().toString() +                  // #⑨
                        "\nEmail: " + editEmailAddress.getText().toString() +
                        "\nPassword: " + editPassword.getText().toString());
            }
        });
    }
}- #①は、入力したテキストを表示するTextViewを取得する
- #➁は、入力したテキストを表示するTextViewを初期化する
- #③は、「Name」を入力するEditTextを取得する
- #④は、「Email」を入力するEditTextを取得する
- #⑤は、「Password」を入力するEditTextを取得する
- #⑥は、FloatingActionButtonを取得する。
- #⑦は、取得したFloatingActionButtonが押されたときに、発生したイベントを受け取るイベントリスナを、「setOnClickListener」メソッドを使って関連付ける
- #⑧は、ボタンが押されたとき、発生したイベントを受け取る「OnClick」を定義する
- #⑨は、TextViewを使って、「Name」、「Email」、「Password」に入力されたデータを「getText().toString()」で取得・文字列変換して表示する。
テキスト入力の実行
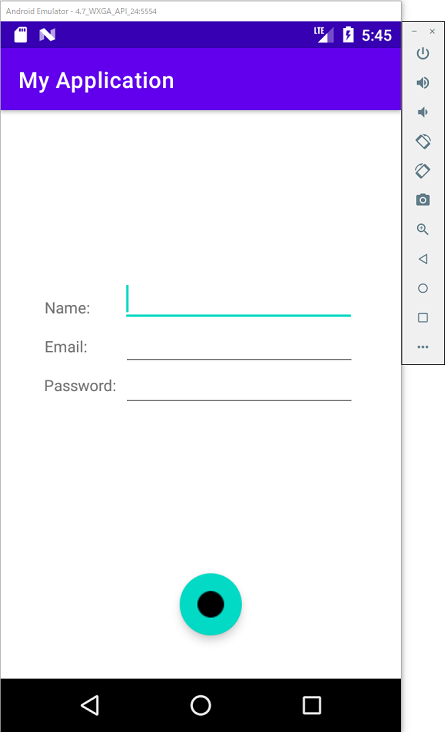
作成したテキスト入力のJavaコードをAndroidエミュレータで実行します。
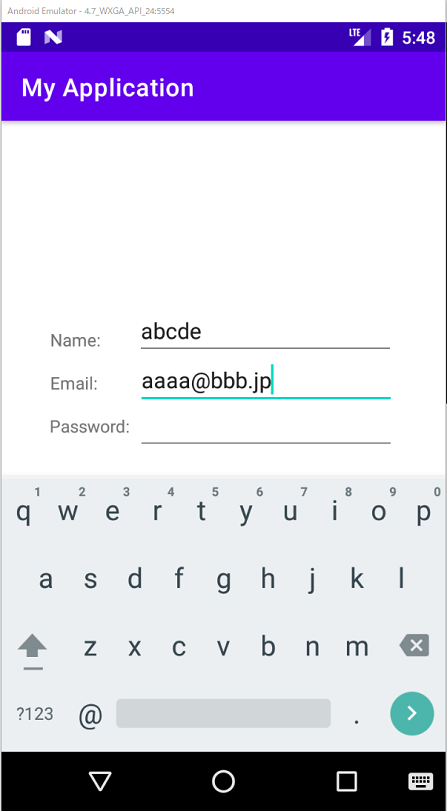
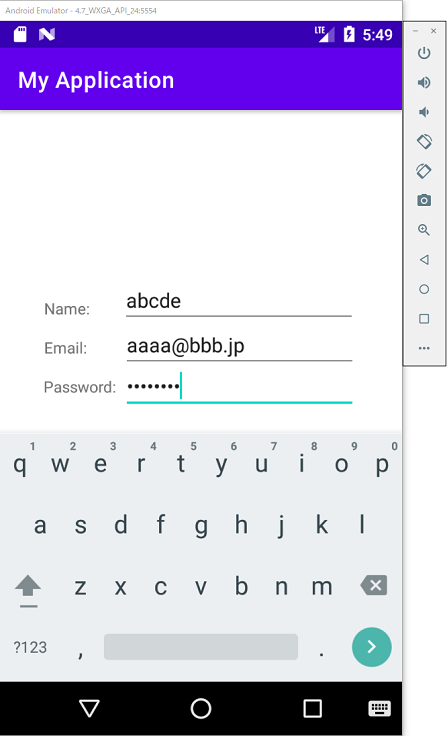
次のようにAndroidエミュレータに初期画面が表示されます。次のデータを順次入力します。
- abcde
- aaaa@bbb.jp
- 12345678
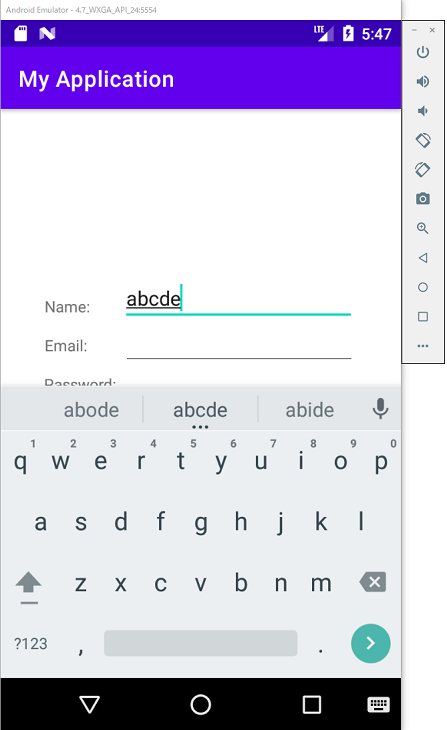
「Name:」にカーソルを置くと画面キーボードが表示されるので、「abcde」と入力します。
「Email:」にカーソルを置くと画面キーボードが表示されるので、「aaaa@bbb.jp」と入力します。
「Password:」にカーソルを置くと画面キーボードが表示されるので、「12345678」と入力します。
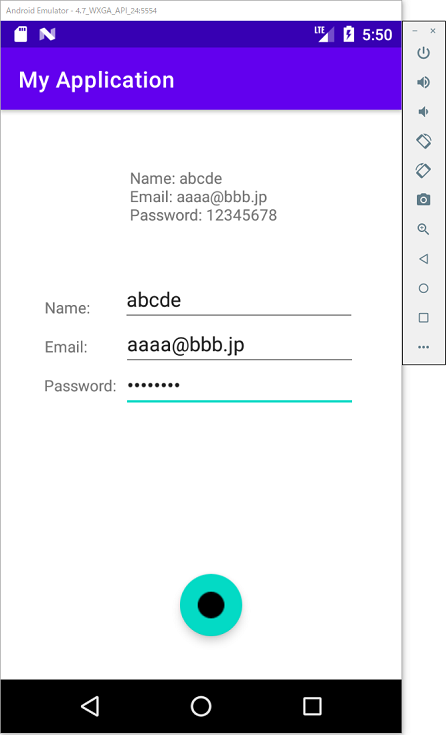
画面の下部に表示されたボタンをクリックすると、画面の上部に入力したテキストが表示されます。
本節の説明は以上になります。