
アラート表示
アプリでボタンを押した時の処理の確認や分岐などを明示的に行うUIがアラートです。アラートも地図と同様にプレビュー画面で配置せずにコードで処理を定義するUIです。ここではアラートの基本的な仕組みについて学びましょう。
アラートを表示する
アラートはそれ自体を表す構造体は持たず、Viewで汎用的に使えるalertメソッドを実行した時に自働的に表示されます。
https://developer.apple.com/documentation/swiftui/view-presentation
プロジェクトを作成後に、ContentView.swift を次のように編集してください。
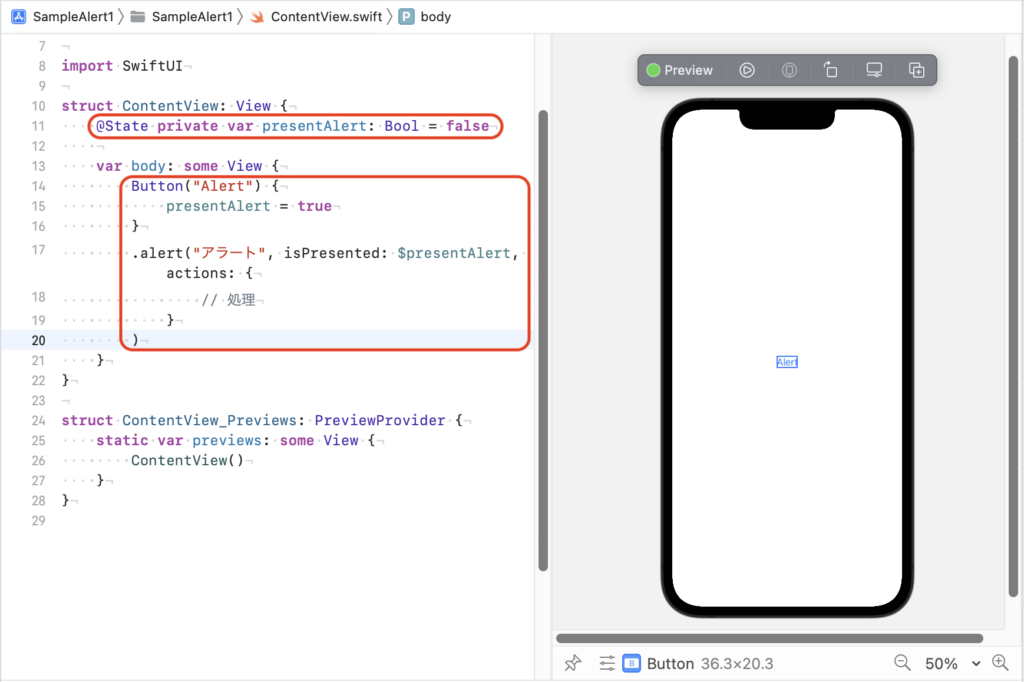
struct ContentView: View {
    @State private var presentAlert: Bool = false

    var body: some View {
        Button("Alert") {
            presentAlert = true
        }
        .alert("アラート", isPresented: $presentAlert, actions: {
                // 処理
            }
        )
    }
}
最初にBool型のバインディング変数「presentAlert」をfalseで定義します。
ボタンを配置して、そのボタンを押したときに変数presentAlertが true になる処理を作成します。
その後に、alertメソッドを記述します。alertメソッドの書式は次の通りです。
alert(アラートのタイトル, isPresented: Bool型のバインディング変数, actions: { アラートのボタン配置などの処理 })
Bool型のバインディング変数が true のときに、アラートを表示します。
サンプルではボタンを押して変数presentAlertが true になったときに、alertメソッドが実行されアラートが表示されます。
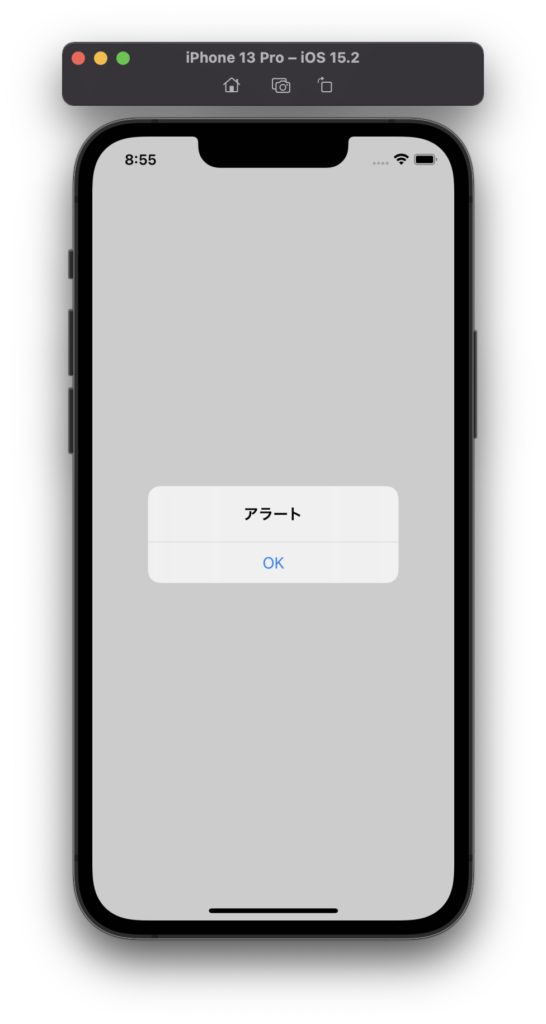
シミュレーターを起動してアプリを実行した後、ボタンを押すと次のようにアラートが表示されます。
これまでのUIと異なる点は、次の2点です。
・アラートを管理するオブジェクトを利用せずに、一般的なUIからalertメソッドを実行する
・UIのインスタンスの引数ではなく、alertメソッドの引数としてバインディング変数を指定する
少し特別な使い方をするUIだと覚えておいてください。
アラートにメッセージを表示する
アラートにタイトルだけでなくメッセージも表示する場合は、次の書式でalertメソッドを記述します。
alert(アラートのタイトル, isPresented: Bool型のバインディング変数, actions: { アラートのボタン配置などの処理 }, message { Textオブジェクト } )
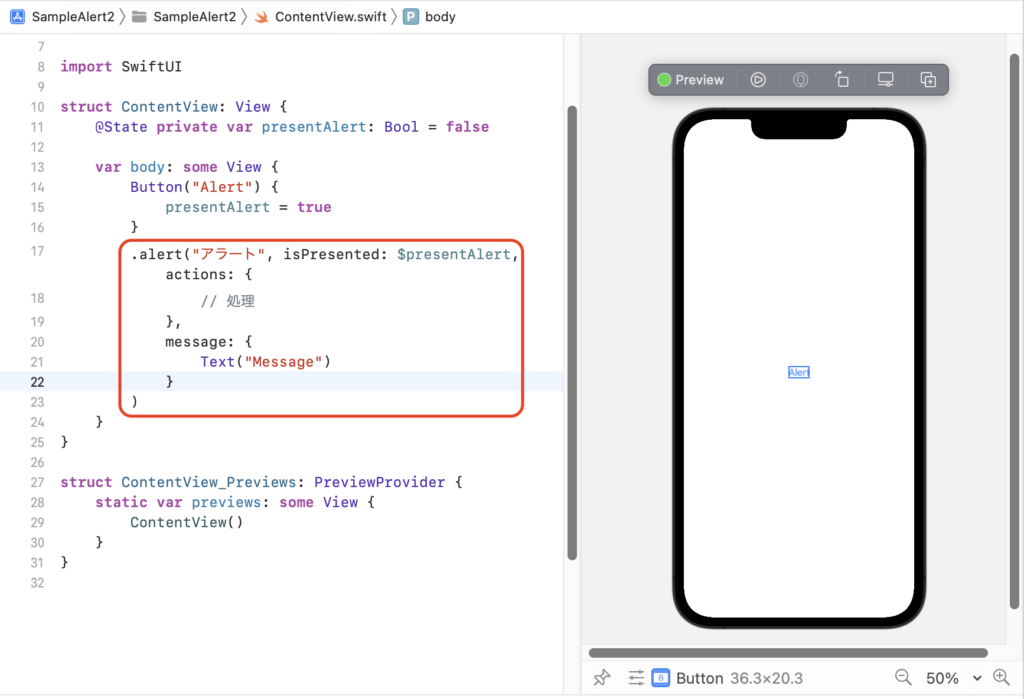
struct ContentView: View {
    @State private var presentAlert: Bool = false

    var body: some View {
        Button("Alert") {
            presentAlert = true
        }
        .alert("アラート", isPresented: $presentAlert, actions: {
                // 処理
            },
            message: {
                Text("Message")
            }
        )
    }
}
ラベル message の後に、メッセージとして表示するTextオブジェクトを記述します。
シミュレータを起動してアプリを実行すると、次のようにメッセージを伴ったアラートが表示されます。
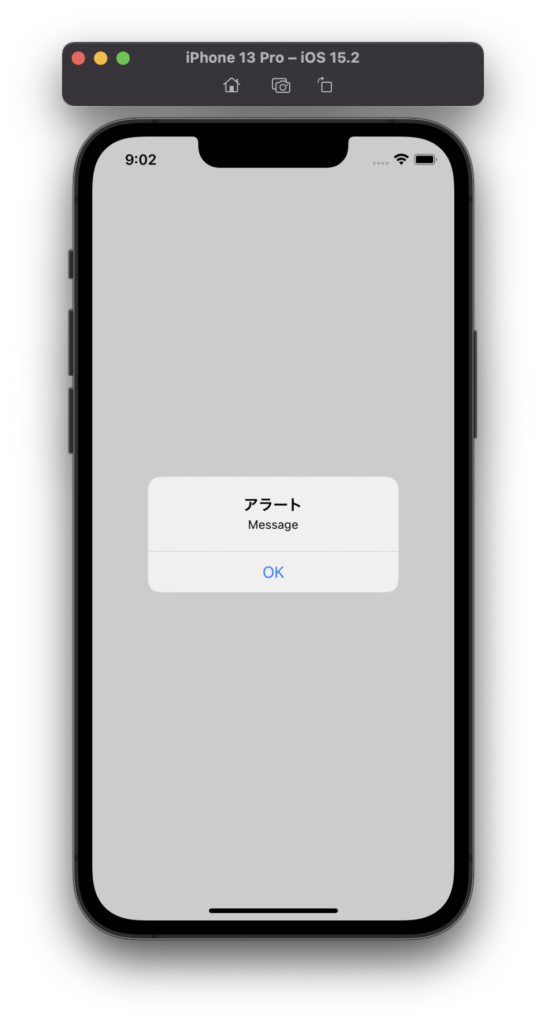
message ラベルの引数が文字列ではなく、Textオブジェクトであることに気を付けてください。
アラートにOK/キャンセルボタンを表示する
これまでのサンプルでは、アラートで規定で表示される「OK」ボタンのみの表示でした。
アプリでよく使われるように、「OK」「キャンセル」のボタンを並べ、それぞれのボタンを押したときの処理も定義する場合は、alertメソッドの actions 引数でボタンを指定します。
struct ContentView: View {
@State private var presentAlert: Bool = false
var body: some View {
Button("Alert") {
presentAlert = true
}
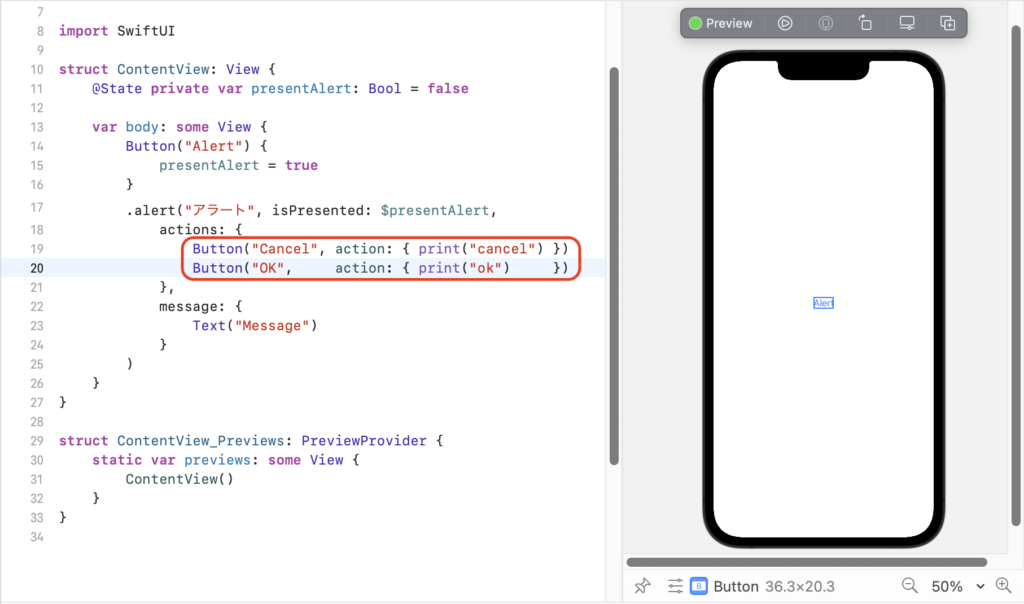
.alert("アラート", isPresented: $presentAlert,
actions: {
Button("Cancel", action: { print("cancel") })
Button("OK", action: { print("ok") })
},
message: {
Text("Message")
}
)
}
}
画面にUIを配置するときと同様に、actions引数のブロック内でアラートに表示するボタンを指定します。
シミュレーターを起動してアプリを実行すると、次のようにアラートに2つのボタンが表示されます。
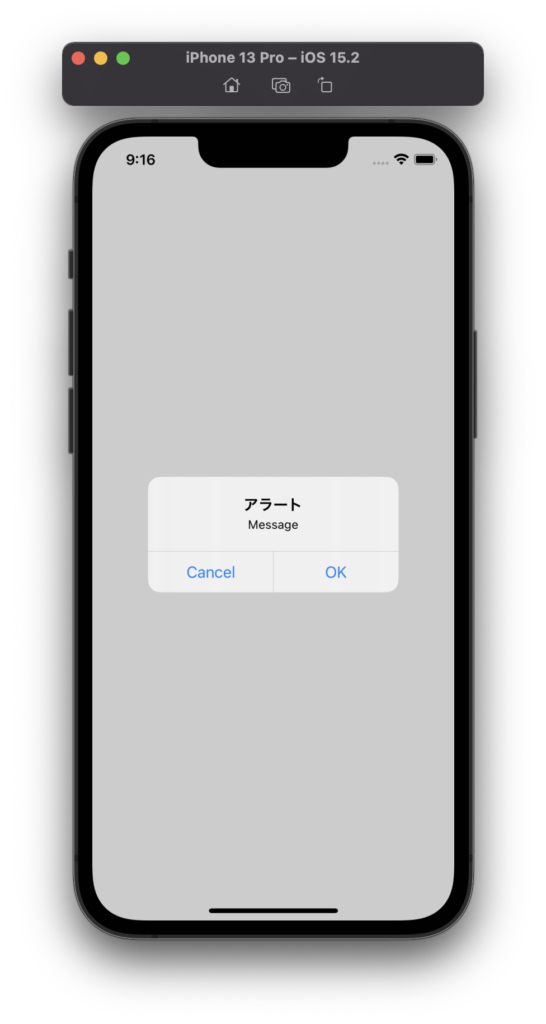
各ボタンを押した時の動作もコンソールで確認できます。
アラートに複数のボタンを表示する
アラートに2つ以上のボタンを表示することも、仕様上は可能です。
actions引数のブロックに表示するボタンを指定します。
struct ContentView: View {
@State private var presentAlert: Bool = false
var body: some View {
Button("Alert") {
presentAlert = true
}
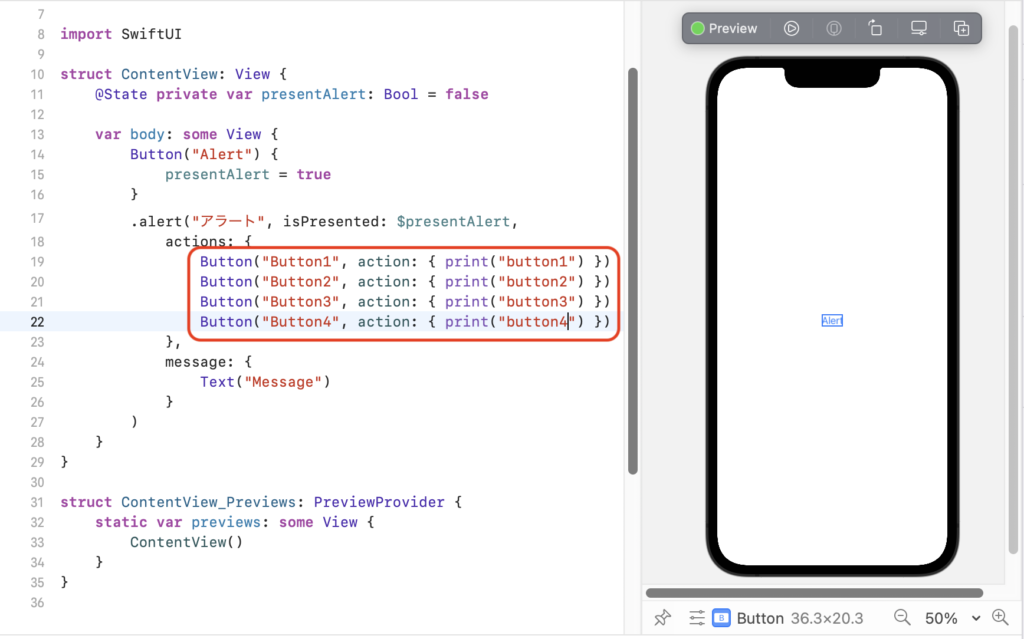
.alert("アラート", isPresented: $presentAlert,
actions: {
Button("Button1", action: { print("button1") })
Button("Button2", action: { print("button2") })
Button("Button3", action: { print("button3") })
Button("Button4", action: { print("button4") })
},
message: {
Text("Message")
}
)
}
}
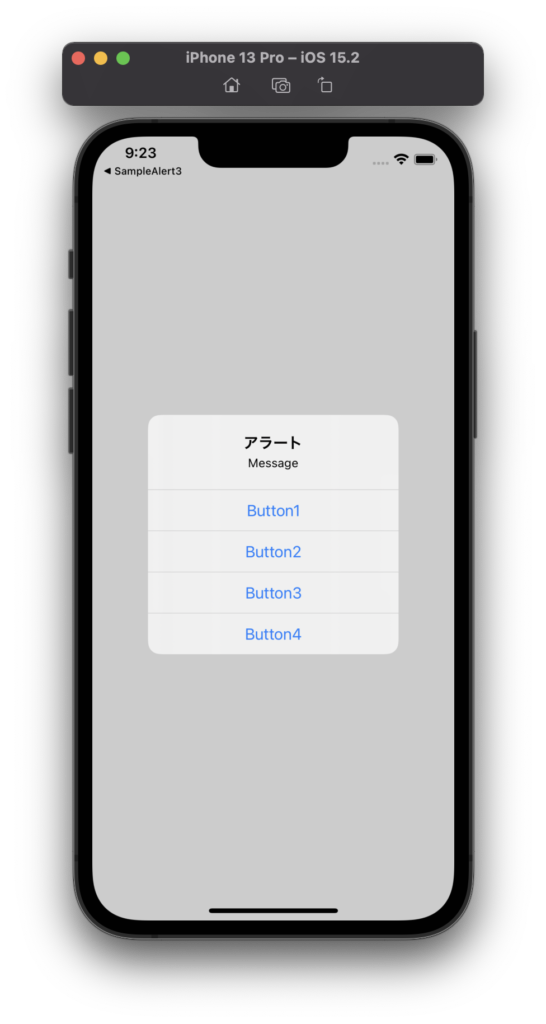
アラートに表示するボタンが3つ以上の場合は、サンプルのようにボタンが縦に並びます。
アラートのようにインスタンスを生成せずにUIを表示できる場合や、UIの中にUI(ボタン)を配置してそこで処理をしていすることもあることを覚えておいてください。